Table of Contents

Disassemble
Clean
Inspect for Reuse
Assemble


Disassemble

TOC
 WARNING 

The unloader valve body is installed with spring tension. Use care when removing to prevent personal injury. Always wear protective eye wear.

Hold the unloader valve body down and remove the two captive washer capscrews and the two plain washers.

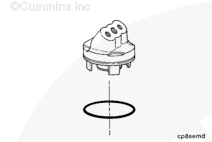
Remove the unloader valve body.

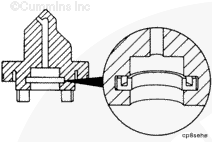
Remove the o-ring seal.

Remove the rectangular ring seal.


SMALL | MEDIUM | LARGE

Remove the unloader valve cap and the unloader valve spring.

Remove the intake valve seat and valve.

Remove the intake valve spring.


SMALL | MEDIUM | LARGE
   

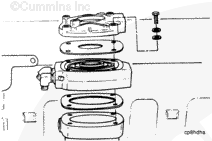
Remove the capscrews, lock washers, and plain washers that hold the cover and head to the crankcase.

Remove the cover and discard the gasket.


SMALL | MEDIUM | LARGE
   

Remove the head and discard the gasket.

Hold the head bottom side up, and use thumb pressure to remove the exhaust valve seat assembly.

NOTE: If the exhaust valve seat assembly can not be removed by thumb pressure, use valve seat puller, Part Number 3822674. A press and air compressor seat removal tool, Part Number 3377416, can be used to remove the exhaust valve seat.

Remove the o-ring seal from the exhaust valve seat or head. Remove the exhaust valve.

Remove the compression spring and wear plate from the head.


SMALL | MEDIUM | LARGE


Clean

TOC
 WARNING 

When using solvents, acids, or alkaline materials for cleaning, follow the manufacturer's recommendations for use. Wear goggles and protective clothing.

Soak the parts in a kerosene emulsion-based cleaner designed to remove carbon. The cleaner must have a pH of 9.5 or less to avoid turning aluminum parts black. The cleaner manufacturer or supplier must be contacted about solution concentration, temperature, and soak time.


SMALL | MEDIUM | LARGE
   

NOTE: Do not use a scraper to remove carbon and scale, the sealing surfaces can be damaged.

The parts can be scrubbed with a stiff nonmetallic bristle brush.


SMALL | MEDIUM | LARGE


Inspect for Reuse

TOC

Inspect the intake and the exhaust valves for cracks or other damage.


SMALL | MEDIUM | LARGE
   

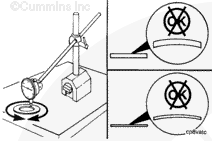
Measure the flatness of the intake and exhaust valves. Both valves must be flat within 0.03 mm [0.001 in].

NOTE: Holset Engineering Co., Inc. recommends that new valves be installed.


SMALL | MEDIUM | LARGE
   

Apply a bluing compound to the exhaust valve seating surface.

Install the exhaust valve on the valve seating surface and check the seating area. Replace the seat if the contact area is not 100 percent.


SMALL | MEDIUM | LARGE
   

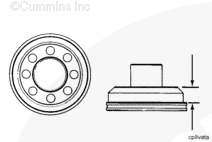
Measure the exhaust valve seat height.

If the seat height is less than 12.32 mm [0.485 in], replace the seat.


SMALL | MEDIUM | LARGE
   

Apply a bluing compound to the intake valve seating surfaces.

Install the intake valve on the valve seating surface and check the seating area. Replace the seat if the contact area is not 100 percent.


SMALL | MEDIUM | LARGE
   

Measure the intake valve seat height.

If the seat height is less than 6.86 mm [0.270 in], replace the seat.


SMALL | MEDIUM | LARGE
   

Use valve spring tester, Part Number 3375182, to check the intake, exhaust, and unloader valve springs. Replace any springs that do not meet specifications.

NOTE: Holset Engineering Co., Inc. recommends that new springs be installed.

Reference the Compressor Spring Force Specifications chart shown below.


SMALL | MEDIUM | LARGE
   

Load Required to Compress Spring to Measurement Length
Spring Part Number
Spring Use
Approx. Free Length: mm [in]
Number of Coils
Wire Diameter: mm [in]
Measurement Length: mm [in]
Minimum: kg [lb]
Maximum: kg [lb]
128080
Exhaust valve
17.02 [0.670]
3.0
2.03 [0.080]
7.11 [0.280]
3.6 [8.55]
4.7 [10.35]
190334
Intake valve
12.70 [0.500]
2.8
1.58 [0.062]
7.11 [0.280]
0.35 [0.65]
0.5 [1.10]
150631
Unloading valve (naturally aspirated) center unloading valve - twin
41.91 [1.650]
11.5
2.03 [0.080]
24.89 [0.980]
14.5 [32.00]
17.2 [38.00]
3023101
Unloading valve (all turbocharged engines)
41.91 [1.650]
10.8
1.65 [0.065]
24.89 [0.980]
5.9 [13.00]
7.7 [17.00]
3049553
E-Type unloader valve
41.91 [1.650]
11.25
1.93 [0.076]
24.89 [0.980]
10.4 [23.00]
12.2 [27.00]
800399-XW
Unloader
17.02 [0.67]
6
1.04 [0.041]
6.60 [0.260]
N/A
2.54 [5.60
 
10.03 [3.95]
1.71 [3.78]
N/A
802000-FZ
Intake and exhaust
10.16 [0.40]
4.25
0.79 [0.031]
4.57 [0.18]
N/A
0.36 [0.80]
 
5.99 [0.275]
0.20 [0.45]
N/A
3054489
Exhaust valve
21.49 [0.846]
4.5
2.54 [0.100]
15.21 [0.599]
3.88 [8.55]
4.74 [10.45]


Assemble

TOC

Install the wear plate and compression spring in the head as shown.

Install the exhaust valve on the exhaust valve seat.

Install the o-ring seal on the seat.

Use clean 15W-40 oil to lubricate the o-ring seals.

Use hand pressure to install the exhaust valve assembly in the head.

NOTE: For SS-296 and ST-676 air compressor models, a press and air compressor seat installation tool, Part Number 3377415, can be used. Exhaust valve seat puller, Part Number 3822674, can also be used to install the valve seat.


SMALL | MEDIUM | LARGE
   

Use new gaskets to install the cylinder head and cover.

Install the flat washers, lock washers, and capscrews.


SMALL | MEDIUM | LARGE
   

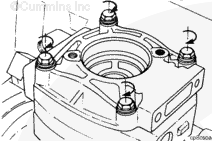
Tighten the cylinder head capscrews of the single cylinder compressor in an alternating sequence.

Torque Value:
  1. 7 n.m    [62 in-lb]
  2. 14 n.m    [124 in-lb]
  3. 20 n.m    [177 in-lb]
  4. 27 n.m    [239 in-lb]


SMALL | MEDIUM | LARGE
   

Install the intake valve spring with the tang down.

Install the intake valve.

Install the intake valve seat with the flange side up.

Install the unloader valve cap spring.

Install the unloader valve cap.

Use high temperature grease (Accrolube Lubrication Teflon™ Grease or equivalent) to lubricate the outside diameter of the cap.


SMALL | MEDIUM | LARGE
   

Install the new rectangular ring seal into the unloader body.

NOTE: The seal must be installed with the grooved side up.


SMALL | MEDIUM | LARGE
   

Install a new o-ring seal on the unloading valve body.


SMALL | MEDIUM | LARGE
   

Use clean 15W-40 oil to lubricate the seal.


SMALL | MEDIUM | LARGE
   

Install the compression spring.

Use Accrolube Lubrication Teflon™ Grease to lubricate the outside diameter of the unloader cap and install it into the unloading valve body.

Install the unloading valve body.


SMALL | MEDIUM | LARGE
   

 CAUTION 

Do not over-tighten these screws. Compressor damage will result.

Hold the unloader body down and install the two plain washers and captive washer capscrews.

Tighten the capscrews.

Torque Value:  14  n.m  [124 in-lb]


SMALL | MEDIUM | LARGE


Last Modified:  28-Oct-2011
Feedback / Help