Table of Contents

Preparatory Steps
Remove
Clean
Inspect for Reuse
Install
Finishing Steps


Preparatory Steps

TOC


SMALL | MEDIUM | LARGE


Remove

TOC

Install four camshaft pilots, Part Number 3824285, over the outer base circle of the valve lobes between the camshaft journals.

Use a rubber band to hold the installation pilots in place. The rubber band must straddle the valve lobe.


SMALL | MEDIUM | LARGE
   

Use one hand to slowly rotate and pull the camshaft from the cylinder block and the other hand to balance the camshaft as it is removed.

Remove the camshaft thrust washer from the camshaft.


SMALL | MEDIUM | LARGE


Clean

TOC
 WARNING 

When using solvents, acids, or alkaline materials for cleaning, follow the manufacturer’s recommendations for use. Wear goggles and protective clothing to reduce the possibility of personal injury.
 WARNING 

Wear appropriate eye and face protection when using compressed air. Flying debris and dirt can cause personal injury.

Clean the camshaft with solvent.

Dry with compressed air.


SMALL | MEDIUM | LARGE
   

NOTE: After the camshaft has been steam cleaned, do not touch the machined surfaces with bare hands. This will cause rust to form. Lubricate the camshaft with clean 15W-40 oil before handling.


SMALL | MEDIUM | LARGE


Inspect for Reuse

TOC

Use a feeler gauge to measure the clearance between the gear and the shoulder on the camshaft.

NOTE: The clearance must not exceed 0.13 mm [0.005 in].


SMALL | MEDIUM | LARGE
   

Measure the seven camshaft bushing journals.

Camshaft Bushing Journal Outside Diameter

mmin
63.37MIN2.495
63.42MAX2.497

Replace the camshaft if the journal dimensions do not meet specifications.


SMALL | MEDIUM | LARGE
   

Inspect the camshaft lobes for cracks, scratches, or other damage.


SMALL | MEDIUM | LARGE
   

Measure the camshaft thrust washer.

Camshaft Thrust Washer Thickness

mmin
2.29MIN0.090
2.49MAX0.098

Replace the thrust washer if it does not meet specifications.


SMALL | MEDIUM | LARGE
   

Measure the camshaft bushings in the cylinder block. Refer to Procedure 001-010 in Section 1.


SMALL | MEDIUM | LARGE


Install

TOC

NOTE: The oil grooves on the thrust washer must be toward the camshaft gear to prevent thrust washer malfunction.

Apply a film of Lubriplate® 105, or equivalent, to both sides of the camshaft thrust washer.

Install the thrust washer onto the camshaft.


SMALL | MEDIUM | LARGE
   

Install four camshaft pilots, Part Number 3375268, over the outer base circle of the valve lobes between the camshaft journals.

Use a rubber band to hold the installation pilots in place. The rubber band must straddle the valve lobes.


SMALL | MEDIUM | LARGE
   

Apply a film of Lubriplate® 105, or equivalent, to the camshaft journals and the camshaft bushings.

Rotate the camshaft slowly as it is being installed into the cylinder block.


SMALL | MEDIUM | LARGE
   

Align the "O" mark on the camshaft gear with the "O" mark on the crankshaft gear.

Align the timing marks on the camshaft gear with the timing marks on the accessory drive gear.

After aligning the "O" marks, push the camshaft into the bore until the thrust washer fits against the cylinder block.


SMALL | MEDIUM | LARGE
   

Remove the camshaft installation pilots. Do not allow the rubber bands to fall into the camshaft cavity of the cylinder block when removing the installation pilots.


SMALL | MEDIUM | LARGE
   

Use a dial indicator to check the backlash between the camshaft gear and the crankshaft gear.

Place the tip of the dial indicator against a tooth on the camshaft gear.


SMALL | MEDIUM | LARGE
   

Turn the camshaft gear by hand as far as it will freely move, and set the dial indicator at "0" (zero).

 
SMALL | MEDIUM | LARGE
   

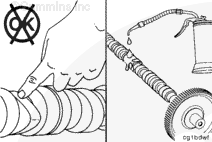
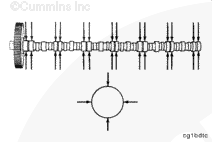
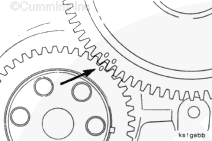
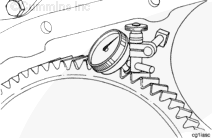
Turn the camshaft gear by hand in the opposite direction as far as it will freely move, and read the dial indicator.

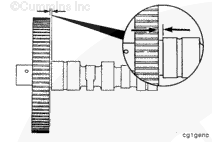
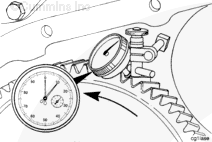
Backlash Between the Camshaft and Crankshaft Gears

mmin
0.08MIN0.003
0.46MAX0.018

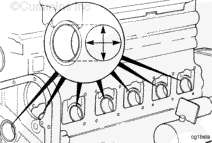
If the backlash is excessive, inspect the camshaft and crankshaft gears for tooth wear and replace if necessary. If the backlash is tight, inspect for debris or damage to the gear teeth and check again.


SMALL | MEDIUM | LARGE


Finishing Steps

TOC


SMALL | MEDIUM | LARGE


Last Modified:  04-Oct-2011
Feedback / Help